Types and selection principles of datum in part processing
First, the type of reference in parts processing
Datums are those points, lines, and areas used to determine the geometric relationship between geometric elements on a production object. According to the role of benchmarks, benchmarks can be divided into two categories: design benchmarks and process benchmarks.
1. Design basis
The datum used on the design drawing is called the design datum. As shown in the figure below, A and B are the dimensions of the center of the hole. The design basis is ① and ② planes. They reflect lines on the figure. The design basis of the aperture D is the axis, and points are reflected on the figure.

2. Process benchmark
The benchmark used for positioning, inspection and assembly in the part processing is called process benchmark, which includes positioning benchmark, measurement benchmark and assembly benchmark. For example, when boring a circular hole as shown in the figure above, one installation method is to use the ① and ② surfaces as the positioning reference, and the positioning reference coincides with the design reference;
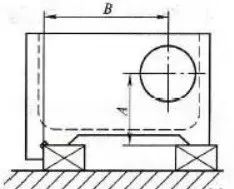
Another method is to use ① and ③ planes as the positioning reference. At this time, the positioning reference does not coincide with the design reference.
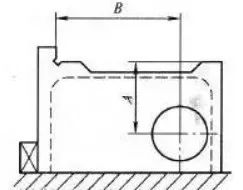
The first step uses the rough surface as a positioning reference. This positioning reference without cutting has been called a rough reference, and the rough reference is only used once. When the machining is continued, the machined surface is used as the positioning reference. This positioning reference after cutting is called the fine reference.
Second, the principle of selection of reference in parts processing
1. Selection of rough benchmarks
The rough datum is a datum that is positioned on the rough surface in the first processing step. When selecting a rough datum, you should ensure that each surface has sufficient machining allowance so that the processed surface has a suitable mutual position with respect to the non-machined surface. The selection principles are:
(1) Use the surface of the workpiece that does not need to be processed as a rough reference to ensure that the position error between the processed and non-machined surfaces is minimized.
(2) If it is necessary to ensure that the machining allowance of an important surface of the workpiece is uniform, the surface should be selected as the rough reference.
(3) A rough and sufficiently large rough surface should be used as a rough reference.
(4) The rough datum cannot be reused because the surface accuracy of the rough datum is low, and it is not guaranteed that the workpiece remains in the same position during two installations.
2. Selection of fine benchmarks
In the following steps, the processed surface must be used as a positioning reference. This positioning reference is called a fine reference. The selection of the precise reference directly affects the mutual position accuracy of each surface of the part. Therefore, when selecting the precise reference, it is necessary to ensure the machining accuracy of the workpiece and the convenience and reliability of clamping. The principles for choosing a fine benchmark are:
(1) Principle of benchmark coincidence: Use design benchmarks as fine as possible to avoid positioning errors caused by misaligned benchmarks.
(2) The principle of the same reference: the same fine reference should be used for as much surface processing as possible to reduce the error caused by changing the positioning reference and make the fixture structure uniform. For example, the center hole is used as the fine reference for machining shaft parts, and it is always used as the fine reference in the turning, milling, and grinding processes, so as to ensure the coaxiality between the various journals. It can also increase productivity. For another example, when machining gears, the inner hole is usually processed first, and then the inner hole is used as the fine reference.
(3) The principle of mutual reference: Use two surfaces on the workpiece that require mutual position accuracy alternately as the positioning reference. For example, to process a short sleeve, in order to ensure the coaxiality of the hole and the outer circle, the outer circle should be used as the positioning reference grinding hole first, and then the polished hole should be used as the reference basis for grinding the outer circle.
(4) Easy installation and simple structure of fixture.
(5) Try to choose a surface with a simple shape and a large size as a fine reference to improve the stability and accuracy of the installation.

